 BIOS Chip installation - removal - Instruction for installing and removing a BIOS-Chip
- Unplug the power supply! On notebooks remove all accumulators!
- Prevent your PC components before static electricity!
- Proof and adjust the Pin position of your chip before insertion!
Adjust Pins before insertion:

If all Pins are too far apart, place the chip sideways on a solid underground. Hold the body of the chip with both hands and press the body carefully against the 4 lower pins.

Bent pins can be re-aligned with a tweezer which has 2 flat ends. To do this, hold the pin which is bent and press the tweezer.
Removal - Chip in DIL/DIP-Socket:
Removal with screwdrivers: To remove the BIOS-Chip you can use 2 small screwdrivers by placing them on both chip faces between the socket and the chip and then pull out the chip with light pressure on both sides. With just one screwdriver, you should pull out a maximum of 1-2mm on one side and then switch to the other side, otherwise the pins will bend too much!
Removal with 2 screwdrivers
Professional Tools:

DIL-Extractor I
DIL-Extractor II
(not available in the shop)
Installation - Chip in DIL/DIP socket:
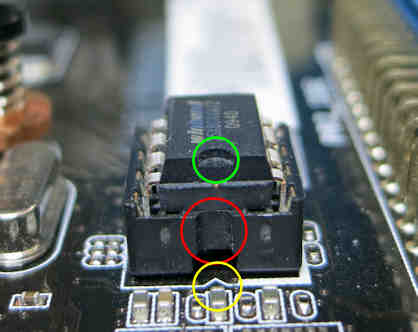
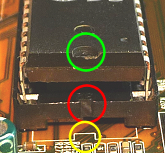
Installation: Chips in DIL package often have a milled curve (green circle) in the middle of one of their front faces, or another marking that the opposite front face does not have. The same applies to DIL sockets, which usually also have a marking or notch (red circle). If this is missing, you will often find one or two numbers printed on the circuit board around the base, or an other marking (yellow circle). With a socket with e.g. 32 pins you will usually find a "1" on one side and a "32" on the opposite side. To insert the chip now, either bring the two markings (chip and socket) on top of each other, or position the chip in such a way that its marking with the "1" is on top of the other. When pressing together, make sure that all pins are correctly positioned in the socket!
Mainboard with DIL-Socket
DIL/DIP-Socket
After installation: boot the PC, enter the Bios-Setup and load the "Default/Optimized Settings". If your PC don't start, please read the BIOS-FAQs!
Removal - Chip in PLCC-Socket:
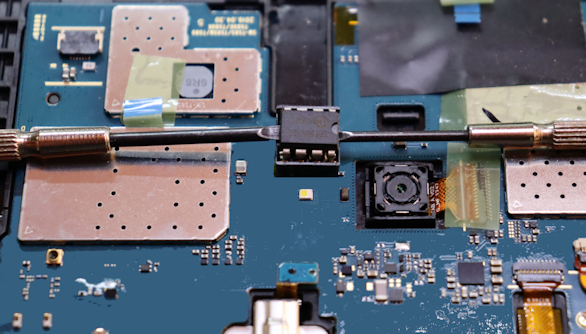
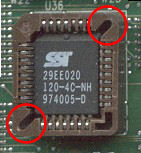
Removal with screwdrivers: To remove the BIOS-Chip you can use 2 small screwdrivers by placing them into the small diagonal slits and then pull out the chip with light pressure on both sides. With just one screwdriver, you should pull out a maximum of 1mm on one side and then switch to the other side, otherwise the pins will bend too much!

Removal with 2 screwdrivers
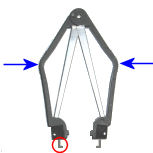
Removal with PLCC-Extractor: insert one hook (middle picture, red marker) into the socket slit (left picture, red marker). Now do the same with the other hook. Press the Extractor against the socket and press at the same time the 2 Extractor legs (middle picture, blue arrows) together. Attention: don't pull the Extractor, press only the 2 legs together until the chip comes out!
PLCC-Socket
PLCC-Extractor

Paper clip
Another way is to use a paper clip. Take one or two paper clips and curve it to 90 degrees with a length of circa 2 millimeters.
Installation - Chip in PLCC socket:
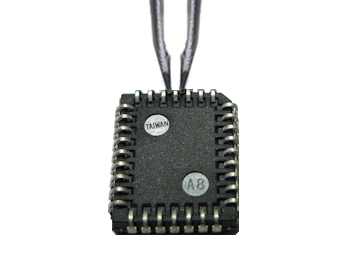
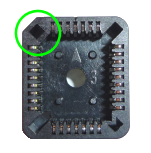
Installation: A PLCC-Chip has one flat corner as a marker (see picture), and the socket in most cases too. If the socket has no marker, take a look on the printed circuit board, to find the number "1" around the socket area. Put the chip's marker and the socket's marker on top of each other, or the chip's marker and the number "1".
PLCC-Socket
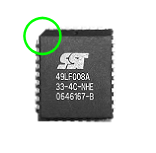
PLCC-Chip
After installation: boot the PC, enter the Bios-Setup and load the "Default/Optimized Settings". If your PC don't start, please read the BIOS-FAQs!
Einträge: 9
Karl F. 24.Feb.2024 14:47It works. I can't believe it, but it worked!!!! I know this is a small thing in the world, but it gave me so much joy fixing this silly P9X79 motherboard. Vielen dank Herr. Rosenbaum for making this service available to us all :)
Bronislaw Gil 20.Oct.2023 15:48Einfache Bestellung
Desi 10.Mar.2019 22:04Hello, very happy with your service and thank you. I got the bios chip and installed without much problems. My PC is once again up and running, saved me having to buy a new one or exspensive repair cost at Pc shop. Once again thank you. Kind Regards Desi
biosflash 28.Oct.2018 06:40@VANLONGvanlong
The sticker is bigger than the chip, so Asus has used an other place. Your chip could be a SOP-8
VANLONGvanlong 28.Oct.2018 02:07I cannot find the BIOS Chip on the mother-board of my ASUS X71SL laptop. I saw only a sticker on motherboard :"666 AMIBIOS® NB© C1999 CC20 9610" - But NO CHIP under the sticker.
biosflash 17.Sep.2018 14:49@Carlos Marvel
SOP-8/SOIC-8 packages are normally soldered and must be desolder, only some manufacturers are using SOIC sockets for an easy replacement.
Carlos Marvel 17.Sep.2018 12:57What about SOP-8/SOIC-8 package types? Those can´t be installed and removed?
wv.sp 26.Apr.2017 19:48The bit trick is one flat corner. :-)
yaseen 11.Nov.2013 12:14excellent guidenss
Most wanted
BIOS Beeps BIOS Boot CD BIOS Boot Diskette BIOS Boot Logo BIOS Boot USB Stick BIOS Chip installation removal Programming BIOS Chip Type list CMOS Reset BIOS Help BIOS ID BIOS Passwords BIOS Software Tools 3. Start the BIOS Update 4. BIOS Update failed? BIOS Update Howto 2. Choose BIOS Update method 1. Preparation BIOS Updates, Drivers, Manuals, etc. Online Shop
Favorite items


